Saturday, August 28, 2010

MonoPoly

Today I played with MonoPoly.  Not Monopoly the game, which I played with my siblings for hours on end, but MonoPoly, a clear polyester monofilament thread by Superior Threads.  When I first got my longarm, I tried to use MonoPoly thread without success.  Taking classes and talking with other longarmers, I found this thread to be one of the more temperamental threads to use on a longarm.  But there are lots of people who have used this thread successfully so I figured it would be a matter of time and learning how to adjust the tension and quilt with this thread.

Today was the day!  After almost two years of using my longarm machine, things have been coming together quite nicely this summer.  I've amassed a good selection of templates that are both straight and curved, the threads I've collected have worked nicely on both the customer quilts and the quilts I've quilted for the Quilts of Valor and the early problems with thread tension have almost disappeared.  The big thrill - - -  I finally have mastered the tension settings for using MonoPoly thread.  Yippee Yeah!

One of the tricks I've learned is to keep the bobbin tension adjusted around the same level regardless of the top thread.  With the bobbin tension adjusted correctly, adjusting the top thread has been much easier.  I've eliminated the loopies that plague new longarm quilters.  I've had my share of loopies in the past - which means I've also done my share of unquilting.  Funny how it only takes 10 minutes to quilt a freehand pattern that takes 10 hours to take out.
The MonoPoly thread is the shiny spool on the horizontal spool thread.  I skipped the first thread guides, bypassed the Thread Counter, only went through the Intermittent Tensioner (black knobby thing) rather than 1 3/4 times around, and only 3/4 times around the Rotary Tensioner (white knobby thing).   Then, I lowered the tension on the white knobby thing by loosening it one full turn.  Works like a charm and the stitches on the back side are lovely!

How does this border look?  I still need to do some filler quilting around the vine but I have the outline stitching completed with the MonoPoly thread.


This is the bottom border with the flower pot that Melissa inspired.  She did a wonderful applique border on a quilt at BIQR last year and I liked her flower pot.  Looking around the house, I found a flower pot that the daughter of a friend made for me.  It was a pleasing shape so I used that for this pot.  What a lovely base for this quilt.
I'm so excited about this working so well that I can hardly stand it!  The thread didn't break once!!  Yippee Yeah!!!

Cheers!
Margaret

Monday, August 23, 2010

Groups of Three

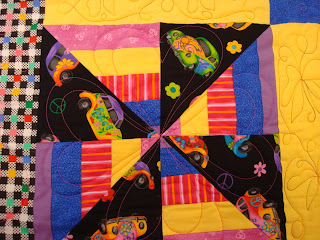
Today was QOV day in Columbus.  I had completed quilting two of the four quilt tops in the queue last week.  I finally gathered up the courage to load a wonderful, bright quilt that I wanted to quilt with VW Beetles.  There were Beetles in the fabric so it was just the right thing to do.  When I got done, I was so excited, I took it off the frame and rushed over to deliver the quilts.  Here's the quilt with the bright VW Bug:

Look at those cute bugs in that fabric!  I used flourescent pink thread to quilt the hearts in the big blocks and the VW Beetles racing around the borders.  The butterflies were quilted using a variegated thread that included all of the colors in the quilt.

Susan is holding the quilt she completed in February.  She was tickled  pink - just like the thread!
Alice made a quilt that will go to someone fighting breast cancer.  There are lots of lovely shades of pink fabrics and I had a wonderful variegated pink thread to use.

Here's Alice peeking over the top of her quilt.  I love this 9 patch design and the effect of the light and dark pinks
The third quilt was one of Flossies.  It was fun to quilt and I had the perfect thread for it, too!  It was an interesting combination of yellow, purple and green that went beautifully with her quilt.

Myra's holding one side and Becky's just peeking around the other.  I love the vibrant color combinations.
Next on my list for the longarm were three baby quilts.  Last year I had done some strip piecing of these fun fabrics and completed one quilt for a charity auction.  The remaining blocks have been sitting for over a year.  I got them assembled a few weeks ago but was waiting for a lull in the activity. Now they're quilted!  I made them just wide enough to fit on a single width of fabric and I had enough of the dinosaur fabric to back all three quilts.

See the extra dinosaur fabric in the front of the picture?  Two are sashed using the red fabric but I ran out when making the third quilt.  The yellow adds a bit of zing and I'll bind it with the yellow fabric as well.
There's even a little over 1/2 yard of dinosaur fabric left.  Not sure what I'll do with it.  What's with dinosaurs this year???  Now to finish the bindings. 

Cheers!
Margaret

Sunday, August 22, 2010

What's Wrong with this Picture?

You guessed it - no sewing machine!
After all of the progress sewing Friday evening, I was back at it Saturday morning.  I still had the finishing touches to put on the four pillowcases with plans to seam the backing for another QOV quilt waiting in the wings.  I started on the first pillowcase and got that band sewn down, ironed the finished case and went on to the second one.  Changed the color thread so it would match the trim and started to sew.  The sewing machine went bonkers, making a new noise after just a few stitches.  I removed the material from under the presser foot and noticed major loopies on the underside.  Took that stuff out and repeated the process, making sure to hold the ends of the threads so it didn't get stuck.  Take Two...same noise, same issue.  Took that stuff out and removed the bobbin to be certain I had inserted the bobbin and thread correctly.  Take Three...same noise, same issue.  It was then I noticed the screen on the Sewing Computer (as my owner's manual refers to it) wasn't showing the normal icons.  Stuff was missing from the screen.  Turned it off and back on.  Take Four...same noise, same issue, same lack of stuff on the screen.  It was then I realized the Sewing Computer had run amok.

After a call to Shiisa Quilts to confirm what I needed to do, I boxed it up and trotted back to Bloomington so it could be repaired.  Boo hoo!  Janet was very comforting and helpful in assuring me it wouldn't take forever and that it was likely a quick fix for the technicians.  Despite this assurance, I'm still feeling withdrawal.  Oh, well...did that stop me from buying more fabric?  Nooooo!

Rather than doing a two-way fracture with the blue panels I decided it really would be better as a four-way fracture so I bought another set of panels.  I also spied some red fabric that would make a tremendous border for the blue fracture so had to buy some of it.  And then there was this great black and gold fabric that will be a terrific border for the other fracture that I was able to complete before my Sewing Computer went blooie.

The red fabric is much brighter than in the picture and has beautiful gold calligraphy that is just perfect as a complement to the figures in the panel.
I'm so excited about having the materials to complete these fractures!  Now all I need is a Sewing Computer to complete the project!  Good thing Shiisa is so close and it will get fixed so quickly.
 
Stay tuned for the results - but don't hold your breath as it may be a week or so before I get my Sewing Computer back.  How will I ever make it???

Cheers!
Margaret

Friday, August 20, 2010

I only needed...

Earlier this year, I found Shiisa Quilts in Bloomington.  It's a wonderful quilt shop with a large selection of Kona Bay Oriental fabrics, perfect for the fractured quilts that have been on my mind recently.  They also have a great selection of other fabrics in "my colors," bright primary colors and lucious jewel tones, along with plenty of prints to go with the wide variety of neutrals that are in the shop.  They are also the Bernina dealer closest to home and when they sent out a 30% off coupon on Bernina accessories, I finally had to go buy the quarter inch foot I've been eyeing for some time.

Deb agreed to go with me after teaching her last class of the day.  It was wonderful having someone along for the ride and we got caught up on all of the happenings now that school has started.  We got to the shop in good time and I got the foot:

Here's what I went to purchase.
It's coming up on time for Camp Margaret at the Beach where I work with my niece on one or two sewing projects.  This year will be easier (for me, anyhow).  For Christmas, Diane got a wonderful collection of sewing supplies from Aunt Margaret including SCISSORS THAT WORK (last year, we had rusted scissors that didn't cut well and were pretty dangerous).  We used the Singer sewing machine that I grew up with - only had to go to the hardware store once to locate some o-rings to replace the rotted o-ring on the bobbin winder.  It was a challenge but with a little ingenuity, we got it to work.  Despite the funny sewing implements we had last year, Diane made a Quillow (quilt that can be folded into its own pocket to become a pillow) and a tote bag.  She did a wonderful job on both of those items.

This year, the Snap Bags will be one of the projects and I had been thinking about a second project.  It struck me that a fractured wall hanging might be the ticket.  If we only cut the panels one time, the sewing is easy and there isn't really any matching of seam lines.  That will give her plenty of rotary cutting experience and straight sewing experience.  So, here's what I bought in preparation for this year's excursion:
There are two different panels - one in blue on the left with it's backing below it and another in purple tones on the right.  The backing for it is the wonderful purple with gold swirls  Too bold for the front but just great for backing.  I actually bought two sets of the mountains on the right so I could create one and then have one set for Diane.  That way, I can test the strip width and get the borders sorted out ahead of time.
 
It was so exciting to have the materials, that I spent the rest of the afternoon working on my set of the purple mountain panels.  Here's the work in progress:

This isn't quite as exciting as the first single fracture I did and I think it's because it's more a still life picture and doesn't have much movement in it.  And it really is purple with a green sky.  Against by silver/gray rug, it doesn't really show that as well.  It was still interesting and fun to create, however.  Technique is from the Fabulous Fractures book by Brenda Esslinger.
Borders are still needed.  I do think the yellow/gold color will be the inner border but I want to look a little bit more for the outer border.  I'm not sure the purple will do it but I'll audition it along with some other fabrics from my stash before I make the final decision. 

In the meantime, it's back to one of the UFO's I'm getting close to finishing.  That's exciting, too!

Cheers!
Margaret

Monday, August 16, 2010

Quilt Show (and Tell) Meeting

We had another meeting of our Quilt Show Committee today. Sorted out lots of different issues and we're making real progress toward the opening of the 14th Biennial Judged Show! Save the dates - October 2 & 3, 2010.


After going through all of the business, we took time for a quick Show and Tell by Susannah. She has been making a gorgeous baptismal gown for the upcoming baptism of a young relative - or was it a family friend?   I was busy working on something else during the first part of her Show and Tell.  She found a pattern in a magazine (didn't get the name of that magazine), found the Swiss batiste fabric for the gown, located some one inch wide lace on the internet, and has been hand embroidering the family initial W to be placed inside some other beautiful embroidery on the gown. Take a look...


Here's Susannah holding the gown. It looks delicate from this angle but up close it is phenomenal. Her embroidery on the front center panel of the gown is beautiful as are the lace insets running up the length of the gown.

Here's the embroidery on the front panel. It's actually turned sideways (the big round circle will be on the bottom). You can see the lace inserts much more clearly in this photo.

Susannah's part way through her work on this initial. She also said that they plan to embroider the initials of each child that uses the baptismal gown on one of the panels of the gown. Another lovely tradition, don't you think?
The other interesting thing about baptisms in her family is that they also hold a baptismal ceremony at their annual family reunion, attended by large numbers of a spread out family. They introduce the baby and then detail their lineage - quite a charming tradition. What a lovely way to pass on a family history to the younger generations.

She also mentioned an Australian magazine, Inspiration Gifts, as having some information that was helpful as she was putting this gown together. Susan seconded this magazine as a wonderful resource for tips and techniques on specialty techniques. Specialty stuff isn't my forte but I'm going to have to check it out. You never know when there might be some little something that will come in handy on a project.

Cheers!

Margaret


Thursday, August 12, 2010

QOV Quilting

At a meeting of the quilt guild's board, we voted to support the local Quilts of Valor group with some funds to defray their costs associated with mailing quilt tops and completed quilts.  Because this group finishes so many quilts, their postage costs to mail quilts to VA hospitals and other locations for veterans is fairly steep.  In her thank you note to the guild, Kathy mentioned that she had 42 quilt tops waiting to be quilted.  Talk about feeling guilty!

I've been harboring a few QOV quilt tops trying to get motivated.  One of the most difficult tasks is to decide on a quilting pattern.  I remember a comment made about a year or more ago by one of the QOV coordinators (not here in Columbus) that she really wanted to see some interesting quilting designs and not more of the same old-same old quilting.  That weighs on my mind each time I start a QOV quilt.

On top of that, Kathy gave me some interesting quilts - one that had corduroy for the backing and another that had a chamois type material - still not sure what it was.  She knows I'm willing to try almost anything at least once. Here's what I turned in on Monday. 

Continuous curve in the 9 Patch and cornerstones with a leafy vine in the sashing.  Several of my longarmer friends have told me that I'll reach a point where things start to come naturally.  My leafy vines are starting to come much more naturally and I think they're looking good!

This quilt was quilted with a variegated thread.  Believe it or not, the thread had each of the predominant colors in this quilt top!  Unusual pairing of lavendar, green and a rusty red color in the quilt and what luck to have a thread with those same colors.  It was actually a thread Gloria had given me because she didn't like it - way too linty (she was right about that) and very thick.  I won't reorder any of this particular thread but it was great to have it for this quilt.  Thanks, Gloria!

I used Kathi's circle boards.  I like the overall effect on the quilt but those boards were a pain in the neck to use!  She had warned me that was the case.  Big problem was that I didn't have the right length stylus to use with her boards so I had to make do with a long, narrow pen whose tip kept falling out.  Try quilting by holding the stylus in the grooves of the pattern boards with your right hand and holding the boards with your left hand.  Then, keep your eyes open for things like running out of bobbin thread, pins in the border and other fun stuff.  A real experience!   I won't be doing this design again any time soon.

I loved doing this quilt.  I used different border designs in each of the different fabric stripes.  Baby Booties was the name of the variegated thread used on the interior - matched the colors in the fabrics beautifully!  I did switch to a black thread for the exterior border since the fabric was a black and white check.
When I delivered these quilts, I also picked up some more to quilt.  We'll see if I can get them done by next Monday - may be tough since I also have to start working on the ribbons for our quilt show.

Cheers!
Margaret

Wednesday, August 4, 2010

Quilting in the Park

Today was the Columbus Star Quilters Guild "Quilting in the Park" day.  Lois Griffith graciously offered her home, the park-like setting of her back yard and screened porch for our gathering.  Today, with temperatures hovering in the mid-90's and the heat index well over 100, we opted to gather inside.  There were people working on quilts - sewing the binding, doing hand quilting, others doing some rug hooking or crochet, several working on applique projects. 
Kay and the Birthday Girl (Cathy) were less than thrilled to have their picture taken.  Didn't stop me!

Susan, Dottie and Jamie had a wonderful window seat and the natural light for their work.

And then there were those flitting from place to place, talking, laughing, eating and just generally having a good time. I was one of those flitting - and what fun I had!  I also learned several things in between the hilarity.  I brought one of my baby quilt tops made from blocks I've had for at least a year.  I love sashing between blocks but have had trouble lining up the sashing in subsequent rows.  With all of the experts in attendance, I knew I'd be able to find the answer as to how you could line those blasted sashes up.  And answers there were!

  1. The smarty-pants answer was, "Well, if you are sewing a perfect quarter inch seam, they should all line up perfectly."  Right.  Hard as I try, I know my seams aren't always perfect.  And that presumes I cut the fabrics EXACTLY right, too.  There's an awful lot of perfect that's needed for that to come out correctly.
  2. Another answer was in the form of a question.  "Do you square up the blocks before you start the sashing?"  Well, I've been known to do that in the past but I hadn't done that this time.  And I distinctly remember a quilter extraordinaire tell a class that they shouldn't have to square up the blocks if they had cut them and sewn them precisely.  (Again, an awful lot of perfect on my part needed for that to happen.)
  3. Another suggestion was to use cornerstones.  I had thought of this possibility but that's extra work cutting the cornerstones and matching the seams.  Sometimes I'm just too lazy to do extra work.  And if the sashing is all the same color, I really would rebel at cutting cornerstones just to sew them together again.
  4. Then Jamie suggested measuring and marking with pins on each side of the connecting sashing to get them to line up.  Well, DUH!  Why didn't I think of that?  It's such a logical and simple answer now that I know it!
With that burning question answered, I flitted around for a while more, collecting items for our Quilter's Boutique.  Several guild members brought in items they had made.  Some were the completion of items started at our July Sew Day.  Others were items they made for the boutique.  Just look at the fun and fancy things that were donated...
Carol had seen some faces at boutiques she saw at other quilt shows - and one showed up!  There were also two photo albums, several jewelry keepers, a book cover and a lovely table runner and a lovely poinsettia wall hanging.

Then it was on to the eating and chatting.  Here are Jeannette, Linda and Janet hovering around the M&M's.  There were also delicious pastries and birthday cupcakes to keep us fed until lunchtime!

It was also great to meet Jan, a newly retired teacher that I hope we'll see at future guild activities.  She had been working on a rug hooking project and Lois provided her with some additional instruction.

I also learned a few binding tricks from Alice.  She has received praises on her bindings from quilt judges and she was working on the binding of a quilt.  I remembered her saying she tied a knot every 10 binding stitches to help anchor the binding in case a part of it was accidentally ripped loose.  While I thought I could guess how that was done, it was so helpful to have her show me her technique.  My guess wasn't even close!  I also have struggled with completing the binding when I get all the way around the quilt.  She and Dottie chimed in on how I should be ending the binding stitches.  There's lots to be said for getting that information from knowledgeable sources and being able to actually see it being done. 
Becky, Sara and Melissa were so industrious, they didn't even look up when I took their picture.
Lucky for the rest of the guild members that my camera battery died!  That's the end of the pictures (sob!).

All in all, a fun day.

Cheers!
Margaret